Feeds:
Posts
Comments

Archive for the ‘SQL Tuning’ Category

Working on a recent consulting job, I was asked to explain the difference in throughput, which is, measured in MB/s verses IOPS as I had recommended a storage array that would provide many more IOPS and throughput than what is currently in use.

For this client I had presented the expected IOPS per type of disk from 7200 RPM, 10K and 15K and how one would calculate the total IOPS per expansion unit but failed to explain the available throughput other than an increase in uplink speed to 6GB.

Throughput is a measurement of the average number of megabytes transferred within a period of time for a specific file size.  Back in the day this was performed using a single computer making a single request for a disk, but in today’s age with large storage arrays that are providing storage to a number of clients we need to measure based on a lot of small read/writes verses a single computer making a large request.

To measure throughput one can use the following formula.

MB/s = IOPS * KB per IO / 1024

With this formula your IO will be your block size.  For an array with 10 10k SAS drives which provide approx 145 IOPS per disk we will use 1450 IOPS, in the real world this will differ based on RAID configuration.  Other than RAID0 there is a penalty for writes.  Not with reads.  For RAID1 and 10 there is an I/O penalty of 2, for RAID 5 there is I/O penalty of 4 and for RAID 6 a I/O penalty of 6.  RAID 6 is popular among SANs.

MB/s = 1450 * 64 /1024 or 90.625 MB/s
MB/s = 1450 * 128 /1024 or 181.25 MB/s
MB/s = 1450 * 256 /1024 or 362.5 MB/s

Hard drive manufactures will advertise 100MB throughput for a hard drive so why wouldn’t you see 1000MB throughput in a RAID 0 configuration.  Because in the real world you are not performing the edge cases they are doing.  Your IO workload will be more than a single sector read.  These disk manufactures don’t share their engineering specifications or what criteria they used to benchmark their drives.  One thing you can bank on is that they do what ever it takes to get the best results possible for marketing.  Your results will vary drastically.

Read Full Post »

I was reading an article over the weekend where the author pointed out that the standard naming convention for SQL Server database files was .MDF for the data file, LDF for the log file and NDF for additional data files.  This was good stuff so far, then the author stated that these can be changed if you want to mess around with your other DBA’s.  I have known for years that the file extensions are merely suggestions (best practice) and that you could change them if you so chose.  Some companies may have policies defined that data files must have an extension of .001 and logs .002, etc.

What I wish the author had pointed out was that if you deviate from what is standard for file extension naming for your data and log files, please make sure your security department adds those new extensions to the list of excludes for your virus protection.  If not, you will have successfully launched a denial of service (DOS) attack against yourself.


Read Full Post »

Without Instant File Initialization turned on, each time a data file on SQL Server 2005 and above is created or has to grow in size, the file or portion of the file added must be zeroed out.  Depending on the size of the file this can be a very time consuming task.

By turning on Database Instant File Initialization, you are telling the operating system to trust SQL Server to properly handle this allocation.  Since you are looking to enable Instant File Initialization you should also consider setting a proper auto growth setting for your database.  Something in MB verses percentage.  This should be a fail safe, you try to implement some type of policy or procedure to monitor the amount of free space in your databases and try to grow them after hours.  What me demonstrate this on YouTube.

While there isn’t an option within SQL Server to turn this on, the process is very simple.  You simply have to add a SQL Server group to a security policy.  To find which group to add you need to run lusrmgr.msc on the workstation or server in question.  Click on Groups, marked with a RED arrow on the top left of the image below.  Then look for the group that states “specified instance of SQL Server”  This is highlighted in the image below.  The group in my experience has nearly always been “SQLServerMSSQLUser”, plus Machine Name, then Instance Name.  Take note of this group (write it down) as you will need to add it to a local security policy.  You can now close out of lusrmgr.

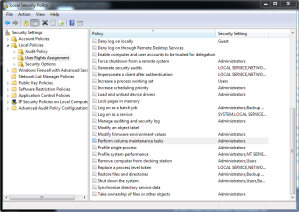
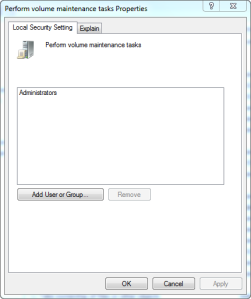
Next click start, run and type SECPOL.MSC.  The dialog box in the image below will open up.  Expand “Local Policies”, click on “User Rights Assignment”, then scroll down the list of Policies until you see “Perform volume maintenance tasks”.  Double click on “Perform volume maintenance tasks”.

Click on “Add User or Group”

Click on “Object Types”

Uncheck all boxes except for “Groups” and click “OK”

Next make sure that “Locations” is your local workstation or server name, not the Active Directory Domain.  Next click “Advanced” and chose “Find Now”, a list of groups should now appear.  This is where you will scroll down the list and find the group you determined from above (lusrmgr.msc).  In my example it is “SQLServerMSSQLUser$WIN-LJDS9D9PTAA$MSSQLSERVER”.  Once you have selected your group click “OK”

You should now see your group listed.

Click “OK” and then “OK” one last time.  That is it. You can now close the Local Security Policy window.  When your database grows or when you add additional files, you should no longer have the long waits of the system having to zero out the additional space.  Want to see a live demo of this, check out my YouTube Channel

Additional things to note is
1) You could just grant access to the SQL Server Service account, however if this Service Account is ever changed you will have to go back and add the new account to the Security Policy.  Which ever way works best for you.  The important thing is to just have it on.
2) By not zeroing out the file there could possibly still be data that could be read.  This is a very slight security risk and there are only a few scenarios where this could pose a risk.  The average Joe could not access the data.
3) Instant File Initialization only works for your data files, it does not have any impact to your LOG files.

Want to see a live demo of this, check out my YouTube Channel

Read Full Post »

Without Instant File Initialization turned on, each time a data file on SQL Server 2005 and above is created or has to grow in size, the file or portion of the file added must be zeroed out.  Depending on the size of the file this can be a very time consuming task.

By turning on Database Instant File Initialization, you are telling the operating system to trust SQL Server to properly handle this allocation.  Since you are looking to enable Instant File Initialization you should also consider setting a proper auto growth setting for your database.  Something in MB verses percentage.  This should be a fail safe, you try to implement some type of policy or procedure to monitor the amount of free space in your databases and try to grow them after hours.

While there isn’t an option within SQL Server to turn this on, the process is very simple.  You simply have to add a SQL Server group to a security policy.  To find which group to add you need to run lusrmgr.msc on the workstation or server in question.  Click on Groups, marked with a RED arrow on the top left of the image below.  Then look for the group that states “specified instance of SQL Server”  This is highlighted in the image below.  The group in my experience has nearly always been “SQLServerMSSQLUser”, plus Machine Name, then Instance Name.  Take note of this group (write it down) as you will need to add it to a local security policy.  You can now close out of lusrmgr.

Next click start, run and type SECPOL.MSC.  The dialog box in the image below will open up.  Expand “Local Policies”, click on “User Rights Assignment”, then scroll down the list of Policies until you see “Perform volume maintenance tasks”.  Double click on “Perform volume maintenance tasks”.

Click on “Add User or Group”

Click on “Object Types”

Uncheck all boxes except for “Groups” and click “OK”

Next make sure that “Locations” is your local workstation or server name, not the Active Directory Domain.  Next click “Advanced” and chose “Find Now”, a list of groups should now appear.  This is where you will scroll down the list and find the group you determined from above (lusrmgr.msc).  In my example it is “SQLServerMSSQLUser$WIN-LJDS9D9PTAA$MSSQLSERVER”.  Once you have selected your group click “OK”

You should now see your group listed.

Click “OK” and then “OK” one last time.  That is it. You can now close the Local Security Policy window.  When your database grows or when you add additional files, you should no longer have the long waits of the system having to zero out the additional space.  Want to see a live demo of this, check out my Youtube Channel

Additional things to note is
1) You could just grant access to the SQL Server Service account, however if this Service Account is ever changed you will have to go back and add the new account to the Security Policy.  Which ever way works best for you.  The important thing is to just have it on.
2) By not zeroing out the file there could possibly still be data that could be read.  This is a very slight security risk and there are only a few scenarios where this could pose a risk.  The average Joe could not access the data.
3) Instant File Initialization only works for your data files, it does not have any impact to your LOG files.

Want to see a live demo of this, check out my Youtube Channel

Read Full Post »

In recent months I have been asked to ensure we are auditing both successful and failed logins, not just failed logins.  It is simple enough to open SSMS, connect to the instance, right click on the server, chose properties, click on security and then check the proper radio button.  When putting together or most recent updates to our server installation guide I decided to spend the few minutes to research how to make this change with few steps.

In my case I need this to be both failed and successful logins.  I will execute the following code within SSMS.

EXEC xp_instance_regwriteN'HKEY_LOCAL_MACHINE', 
 N'Software\Microsoft\MSSQLServer\MSSQLServer',N'AuditLevel', REG_DWORD, 3 (more…)

Read Full Post »

Recently I learned that you can and probably should increase the number of SQL Server Error logs that your instance of SQL Server maintains.  This is real simple to change.  You can make the change via the GUI with a few simple steps or accomplish it with TSQL.

To make this change with SSMS, open SSMS, connect to your instance, expand Management, right click on SQL Server Logs and chose Configure.  You can then check the box “Limit the number of error log files before they are recycled” and increase the number from 6 to any number up to 99. 

Using TSQL you can execute the following statement to increase to 99 files, simply change 99 to how ever many files you would like to retain.

USE [master];
GO

EXEC xp_instance_regwriteN’HKEY_LOCAL_MACHINE’,N’Software\Microsoft\MSSQLServer\MSSQLServer’,N’NumErrorLogs’, REG_DWORD, 99;

GO

Read Full Post »

RedGate SQL Index Manager BETA

I recently attended the first micro training event with Red Gate where Grant Fritchey demonstrated a BETA tool called SQL Index Manager.  This tool is aimed at the accidental DBA or for those like me who are just lazy.  🙂

It is basically a nice GUI to return your index fragmentation level and makes a recommendation whether you should rebuild or reorganize your index.  An extra nice feature is the ability to fix them right then and there or the tool will generate the TSQL code for you to execute later either manually in SSMS or you can through it into a job. 

A much better long term solution though is to utilize Ola Hallengren maintenance script or the one I like to use written by Michelle Ufford.  Even with me having weekly jobs to interrogate my indexes I have been playing with the SQL Index Manager and taking a look at my databases each day during the week to see how much fragmentation is occuring.  What I have noticed is a few volital tables that could use a mid week or nighly reorg.  Fortunately most of these are tables used in various back end operations and do not impact my end users.

I give this tool two thumbs up and would recommend everyone to download it now while it is free and give it a try.  Keep in mind that this is a BETA release.  This product came out of the down tools week so this product was built quickly but I haven’t found to many bugs other than the random crash here and there.  It is still more stable than most Windows OS’s I have worked on. 

Check out RedGate SQL Index Manager

Read Full Post »

I see questions on forums all the time about DBA’s or System Admins finding they are out of drive space due to a very large transaction log.  Post vary a bit on what the admin has tried but a common theme is that they have tried shrinking the file but it didn’t shrink and a plea for help.

Several immediate issues stand out with these post for help.  First is that regular transaction log backups are not occurring.  Second is that if regular backups are not happening, is the admin adequately ready to restore this system if they had to.  What is their recovery plan and the service level agreement for this system?

A quick fix for the users with the swollen transaction log that is crippling the server due to filling up all the available drive space is pretty simple.  Issue a command that will issue a check point in the transaction log and then shrink the file.  A permanent solution is to then start taking regular transaction log backups if you need to be able to recover to a point in time other than since the last full backup.  If you don’t have the need for that type of service level agreement then SIMPLE mode or BULK LOGGED may be your answer.

To issue a check point you have a couple of options.  With all versions of SQL Server you can simply backup the log.  The issue with that in most cases is that you are in a pinch and need to resolve this issue immediately.  You don’t have time to backup a huge log and even if you did have the time, you probably have no need for the huge transaction log.  You just need to quickly issue a check point.  What do you do?

With SQL 2000 and 2005 you can backup the log with TRUNCATE_ONLY.  The proper syntax is something like “BACKUP LOG [DB_NAME] WITH TRUNACTE_ONLY”.  With SQL 20008 and above the “TRUNCATE_ONLY” no longer works as it was deprecated.  A nice workaround is to backup the log to a null file system.  To do that simply use “BACKUP LOG [DB_NAME] TO DISK = ‘NUL'”.  It almost seems like cheating doesn’t it.

Another option is to change the recovery model from FULL to SIMPLE, shrink the log and then set the recovery mode back to FULL.  This option works just as well as TRUNCATE_ONLY or backing up to the NULL disk.

Regardless of which option that you chose to issue the check point and reclaim the wasted space, you should only shrink to a certain target size that you need.  If you shrink the log file to small then it will just have to grow again causing a negative impact to your system.  If you are not certain what size you need, just take a SWAG at it and monitor.  As for how often to take regular transaction log backups, well that depends on your SLA.  I have some systems that backup every 10 minutes, others once an hour.  IT DEPENDS on your environment and needs.

You should also take a full backup.  If something happens between now and your next full backup, you will only be able to recover to your last known good backup.

Read Full Post »

I have been working on a new skill this week and that is implementing transactional replication.  I am of course doing all this testing and learning on a development system and thank goodness I am.  I have found all kind of little nuances with getting this setup.  A fun error I came across today after defining the subscriber was

“cannot be run because the distribution subsystem failed to load. the job has been suspended”

I tried a few basic things like restarting the job, deleting the subscription and recreating it, etc.  I then turned to my trusty Google search and voila, the answer was found.  It appears that after you configure replication for the first time, you must “RESTART” SQL Server Agent.  Once I did that, BAM, my replication was actually replicating.  It was like magic.

Now that I have two databases replicating I can restore my monster database and configure it to replicate in my development environment to bench mark how long the snapshot will take and all that other stuff so I can get this approved for production.  Wish me luck.

Read Full Post »

Sounds weird right, but that is exactly what has happened with a VLDB I inherited.  A third party database that I support contains 23 columns per table and 16 of those columns have a non clustered index.  That’s it, that is all there is to the table? Each month a new table is created and that month’s data is stored in its respective table.  At some point monthly tables are merged into monthly tables and that is where they stay until retention periods are met and the tables are dropped.

Prior to me taking over support of this database all the quarterly and monthly tables were in a single file group.  Since this database is rather large I created file groups based on year and moved the respective tables to their yearly file group.  I started this project in late 2010 so I stopped with the year 2009.

So what is missing with my description of the index structure above.  I stated there are 16 non clustered indexes per table and we have quarterly tables for many years worth of data.  Where is the clustered index?  Yes folks, when I took over this system there was no clustered index on any of the tables.  We are talking billions of rows of data.

In order for you to move the tables into a new file group you have to move the clustered index.  I learned a great deal working on this project regarding indexes.  One of which is that if the table is a heap, SQL Server will assign an 8 byte row identifier for the non clustered index.  In my case I created a new column and chose INT as the data type.  Remember INT is only 4 bytes.

When I first started in development, I created a new table with the same columns as my production tables, created the new column as identity seed, created the clustered index, inserted all the data into the new table and recreated the 16 non clustered indexes.  That is all pretty basic stuff for moving data into a new file group.   Once all this was tested and verified with the vendor I created the new column on all production tables.  This was a necessity since the application uses a view with a UNION ALL across all the tables.  Only the quarterly tables have the clustered index with the identity seed column, the monthly tables contain the new column but all values are NULL.

So what happened?  I created a new table, made the column I created an identity seed, created a clustered index, filled the table full of production data, and then recreated all my non clustered indexes, which should increase the size of my database table right?  Nope.

In the example I show below the data size is the same because my production table also contains the new column but a NULL value.

So I created a clustered index, why did the size of my indexes shrink?  They should have grown right, I went from 16 non clustered indexes to a clustered index and 16 non clustered.  That is 17 indexes on the table.  Remember, before I created the clustered index the table was a heap therefore SQL assigned each row an 8 byte row identifier.  I made the 4 byte column I created late last year a clustered index.  A non clustered index also contains the row identifier.  In the case of the heap, each non clustered index contained the 8 byte row identifier that SQL Server had assigned.  I reduced the size of each non clustered index by 4 bytes.  Multiply that times millions of rows and 16 indexes per row.  It adds up quick doesn’t it?

Take a look at the chart below to see my 2010 data.  In total I reduced the size of my indexes by 8,074 MB for one year of data.  Not bad for a day’s work.


Read Full Post »

Older Posts »